It starts with the heavy rhythm of rain drumming against your basement windows. A familiar spring storm rolling through the neighborhood, carrying the scent of wet asphalt and damp earth. Down in the cool, concrete corner of your foundation, you hear the reassuring, rhythmic thump-hum of your sump pump kicking to life. It is the heartbeat of your home’s defense system. But then, the sound shifts. It stutters. The motor whines, pushing against an invisible wall, and a faint smell of hot metal and ozone begins to creep up the basement stairs. You assumed that white PVC pipe standing upright from the pit was an install-and-forget guardian. The reality is much messier, and ignoring it is exactly how basements flood.
The Silent Choke of the Flapper Valve
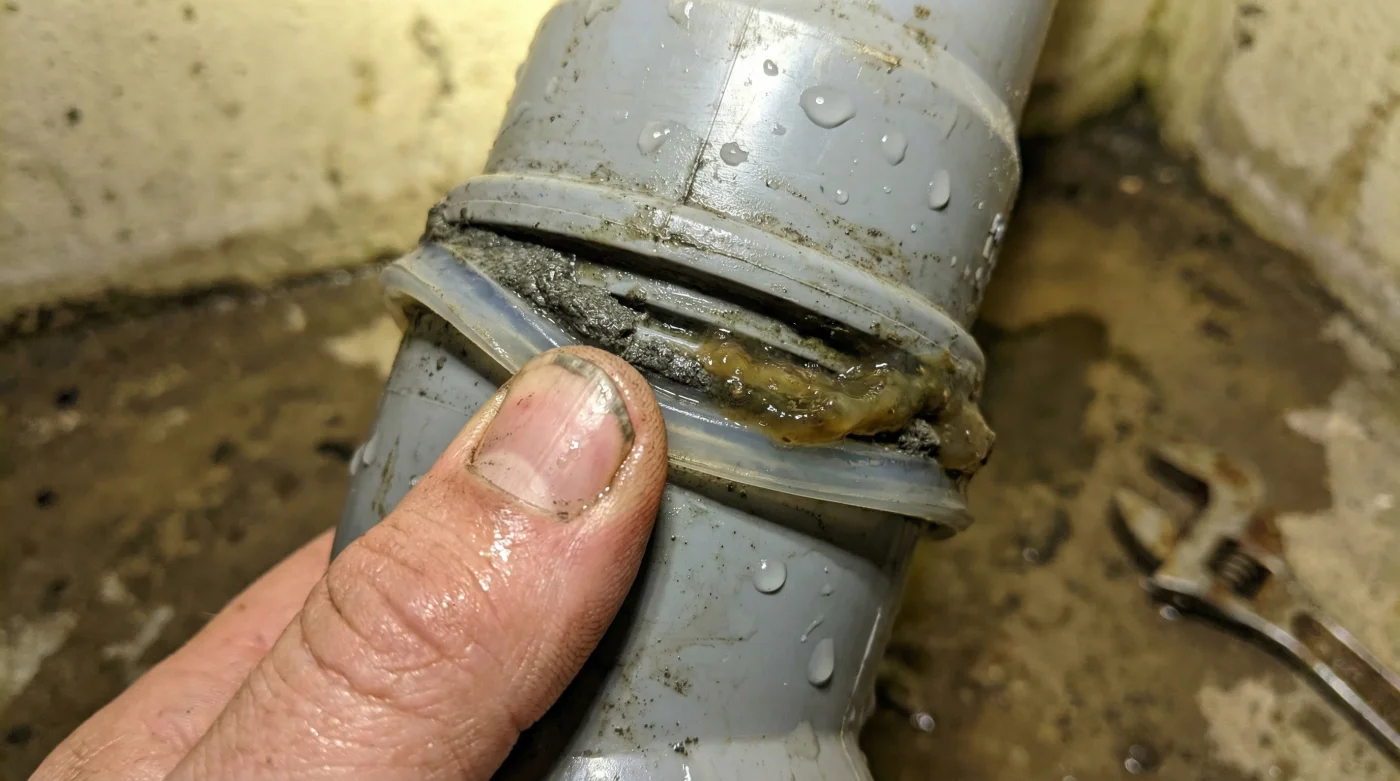
Let us reframe how you look at that vertical discharge pipe. Think of your sump pump check valve not as a static piece of plastic, but as a one-way door holding back the gravity of an entire storm. When the pump pushes water up and out, this little internal flapper opens wide. When the pump shuts off, gravity immediately pulls that heavy column of vertical water back down. The valve slaps shut, catching the water so the pump does not have to push the exact same liquid twice.
But groundwater is never pure. It carries fine grit, tiny pebbles, and sticky iron bacteria. Over time, this debris settles directly on the hinge of that flapper door, propping it open just a hair. Water slips past the seal, filling the pit back up. Your pump turns on again. And again. It becomes a frantic, exhausting cycle.
Years ago, standing in an ankle-deep puddle of ruined cardboard boxes and holiday decorations, I watched an old, weary basement specialist named Elias diagnose my failure. He did not bring out fancy diagnostic tools or complex meters. He simply tapped the side of the check valve with a metal wrench and listened to the hollow rattle. He unthreaded the fitting, pointing to a thick, rusty sludge holding the rubber seal wide open. Water had just been riding up the pipe and falling right back down into the pit, burning the motor out in a useless loop.
| Target Audience | Specific Benefits of Routine Checks |
|---|---|
| New Homeowners | Immediate peace of mind during your first heavy, unpredictable spring storms. |
| Finished Basement Owners | Protects expensive drywall, carpeting, and irreplaceable personal items from standing water. |
| Older Home Residents | Actively manages the higher sediment and iron bacteria levels typically found in aging block foundations. |
The Five-Minute Flush Protocol
Preventing this mechanical exhaustion does not require a plumbing license. You just need five minutes, an empty bucket, and a flathead screwdriver every three to four months. This is your quarterly debris clearing routine, a simple touchpoint to ensure the system breathes easily.
First, physically unplug the sump pump from the wall outlet. You absolutely do not want the motor roaring to life while your hands are working on the discharge pipe. Grab your empty bucket and place it on the concrete floor directly under the check valve assembly.
Most modern check valves are secured with thick rubber couplings and metal hose clamps. Use your screwdriver to loosen the lower clamp first, then the upper clamp. Keep your grip firm on the pipe; the section above the valve holds a few feet of heavy water, and it will drop fast once the seal is broken.
| Mechanical Factor | Technical Specification | Impact on System |
|---|---|---|
| Hydrostatic Pressure | 0.43 PSI per foot of elevation | The sheer weight forcing water back down the pipe when the pump shuts off. |
| Valve Clearance Failure | 1/16th inch of sediment buildup | Enough of a microscopic gap to cause continuous, rapid pump short-cycling. |
| Motor Burnout Timeline | 48-72 hours of short-cycling | How fast a standard residential pump overheats when pumping the same water constantly. |
Carefully guide that trapped water down into your bucket to avoid a mess. Once the vertical pipe is drained, completely remove the plastic check valve assembly. Take it over to a utility sink or walk it outside to the garden hose.
- Lithium-ion drill batteries lose capacity immediately when stored on concrete floors.
- Sump pump check valves fail without this quarterly debris clearing routine.
- Commercial cabinet makers source premium birch plywood using this specific lumberyard phrase.
- Peel-and-stick wallpaper ruins drywall without this single basecoat application step.
- Mineral oil applications restore scratched stainless steel appliances within five minutes.
Reinstall the valve on the pipe, ensuring the printed directional arrow points strictly up toward the ceiling. Tighten the metal hose clamps evenly so they bite securely into the rubber couplings without crushing the plastic pipe inside. Finally, plug the pump back in, slowly pour a five-gallon bucket of clean water into the sump pit, and watch the system cycle beautifully.
| Component Check | What to Look For | What to Avoid |
|---|---|---|
| Valve Body Material | Clear PVC housings so you can visually spot sediment buildup. | Opaque black ABS plastic that hides heavy sludge until the system fails. |
| Flapper Mechanism | Spring-loaded flappers that force a tight, immediate seal. | Gravity-only rubber flaps that are highly prone to getting stuck open. |
| Securing Hardware | Marine-grade stainless steel hose clamps that resist moisture. | Standard galvanized metal clamps that rust rapidly in humid sump pits. |
Reclaiming Your Rainy Days
When you adopt this simple, tactile routine, something in your home ownership experience shifts. You stop cringing every time the local weather forecast predicts a heavy band of rain moving through your county. Maintaining your home becomes less of a reactive panic and more of a quiet, steady stewardship.
That quarterly flush does much more than just wash away grit from a piece of plumbing. It washes away the anxiety of the unknown. You know the exact physical condition of your flapper valve. You know your pump only has to lift that heavy column of water once, operating exactly as designed without unnecessary friction.
Ultimately, true comfort in your home is not just about soft ambient lighting or expensive furniture. It is the invisible confidence that the bones of the house are sound. Let the heavy rain fall outside. Your foundation is ready.
“A sump pump does not die from overwork; it dies from working the exact same gallon of water a thousand times because of a dirty valve.” – Elias, Master Plumber
Sump Pump Maintenance FAQ
How often should I clean the check valve?
Every three to four months, ideally timing one cleaning right before the rainy spring season and another before the winter freeze.What if the rubber flapper inside looks cracked or warped?
Replace the entire check valve assembly immediately. Rubber degrades naturally over time, and a compromised seal cannot be fixed with just a cleaning.Is it normal for water to spill out when I remove the valve?
Yes, the water sitting in the pipe above the valve will drain out by gravity. Always have a large bucket and a few heavy towels ready before loosening the clamps.Can I just pour bleach down the pit to clean the valve automatically?
No. Bleach will chemically degrade the rubber seals in your check valve and the pump itself. Stick to physical brushing and warm water.Why does my pump hum but not move any water?
This usually means the impeller is jammed with rocks or an airlock has formed because the check valve is stuck shut. Unplug it immediately to save the motor from melting down.