You stand in the center of your living room, the faint smell of fresh coffee mixing with the distinct, chalky scent of primed MDF. On the floor sits a stack of architectural molding, the kind that transforms a flat, lifeless box into a Parisian apartment. But your lease agreement, sitting in a drawer nearby, clearly forbids driving a dozen brad nails into the drywall. The dream of a custom-designed space feels immediately restricted by the reality of a security deposit.
Usually, this is where the design ambition dies. You resign yourself to bare walls, assuming that heavy architectural details require permanent, destructive commitment. The standard advice tells you to buy a stud finder, an air compressor, and enough spackle to hide your tracks when moving out, leaving you intimidated and unwilling to risk the financial penalty.
But professional staging and set design tell an entirely different story. You do not need steel fasteners to hold heavy wood against vertical surfaces. You just need to understand how friction, gravity, and shear strength interact on a microscopic level. It is a matter of outsmarting the materials rather than brute-forcing them into place.
The solution hiding in plain sight requires nothing more than a roll of standard blue painter’s tape and heavy-duty adhesive strips. It defies basic DIY logic, yet it holds solid wood trim perfectly flush against your wall for years, peeling away without leaving a single trace when it is time to pack your boxes.
The Physics of the Peel
The hesitation to stick wood to your wall is entirely justified. If you have ever tried hanging anything heavier than a paper poster with double-sided adhesive, you know the dreaded sound: the sickening tear of drywall paper ripping away from the brittle gypsum core beneath it.
The problem is not the weight of the wood itself. The problem is the aggressive chemical bond of the adhesive sinking directly into the highly porous, fragile paper of your wall. When gravity pulls the wood down, it creates a downward shear force. The drywall paper simply cannot withstand that tension, giving way and tearing long before the actual adhesive fails.
By introducing standard blue painter’s tape as a base layer, you change the entire equation. The blue tape is designed with a low-tack, cross-linked acrylic adhesive. It grips the flat wall smoothly but is specifically engineered to release without taking the delicate painted surface with it.
When you attach your heavy-duty strip directly onto this blue tape, you are creating a structural shock absorber. The heavy adhesive bonds fiercely to the slick, non-porous back of the blue tape. The blue tape then distributes that massive sheer load evenly across the wall. It is like breathing through a pillow; the intense force is softened, spread out, and made manageable.
The Brooklyn Soundstage Secret
- GFCI outlet resets fail instantly without cleaning these oxidized internal copper contacts.
- Ikea Pax wardrobes double small bedroom space using sliding ceiling track hardware.
- French drain systems clog entirely without this rapid autumn flushing technique.
- Command Strips hold heavy decorative molding using this hidden painter tape layer.
- Makita impact drivers outlast competitors with this specific chuck greasing routine.
Tailoring the Tension for Your Room
Not all architectural additions behave the same way. The way you layer your tape and adhesive depends entirely on the profile of the wood you are installing and the texture of your paint.
For the Minimalist renter aiming for classic picture-frame molding, you only need thin, lightweight pine or polyurethane trim. A single strip of one-inch blue tape placed at the corners and the middle of your trim pieces provides ample surface area for the adhesive strips to do their work.
For the wainscoting enthusiast dealing with solid MDF baseboards and heavy chair rails, the structural load increases dramatically. Here, you need to widen the footprint of your tape layer. Apply two overlapping strips of blue tape to the wall to create a wider landing pad, ensuring the heavy-duty adhesive strip sits entirely within the blue boundaries without touching the bare wall.
For the historic restorer adding thick, faux crown molding, the angle changes how gravity acts on the wood. Crown sits at a 45-degree pitch, pulling away from the wall rather than just sliding straight down. You will need to apply the tape-and-strip method to both the ceiling contact point and the wall contact point to counteract the outward pull effectively.
The Sheer-Resistant Protocol
Executing this method requires patience. Rushing the adhesive curing process is the only way this system fails. Treat the preparation of the wall with the same deliberate care you would give to preparing a canvas for paint.
Gather your materials and focus on the surface temperature. Adhesives fail miserably in cold, damp conditions. Ensure your room is sitting comfortably around 70 degrees Fahrenheit before you begin your installation.
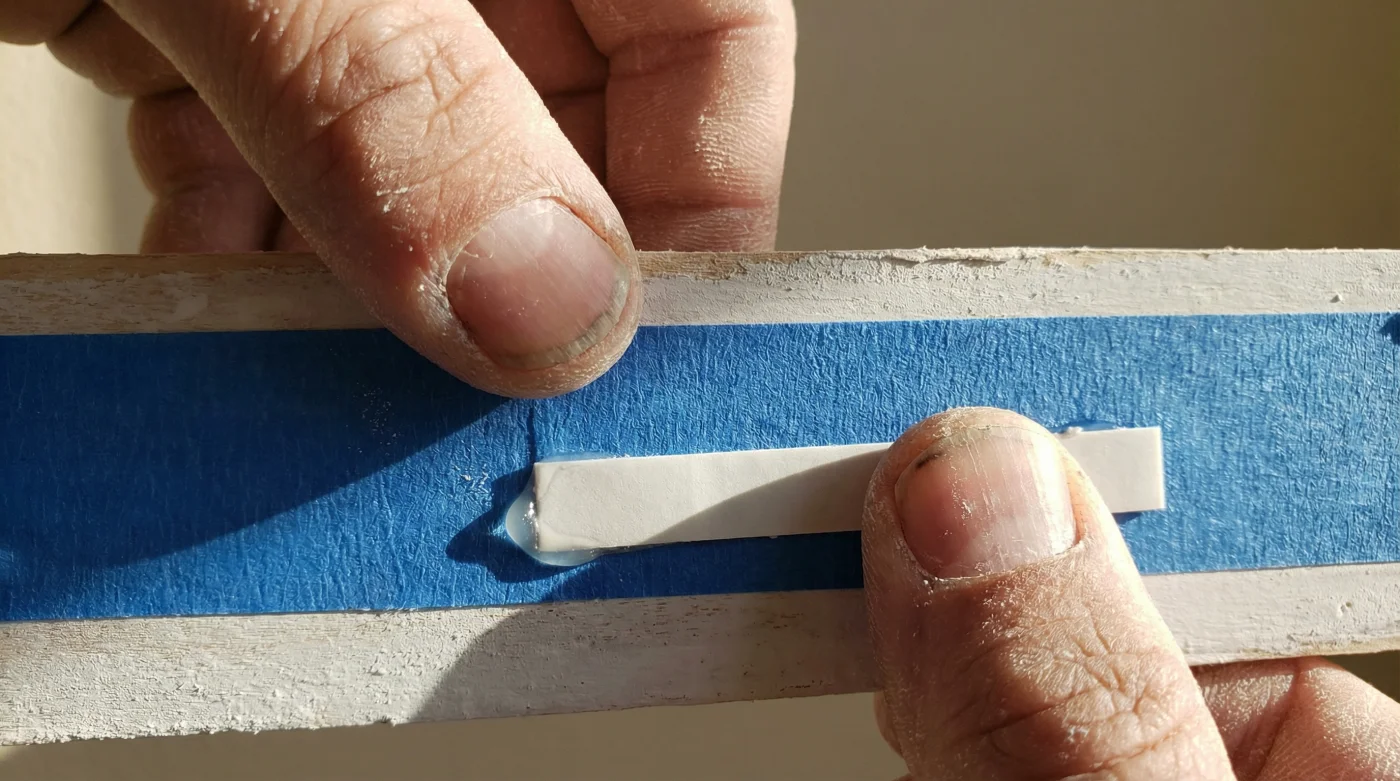
- Wipe the wall precisely where the tape will go using a microfiber cloth lightly dampened with isopropyl alcohol, allowing it to dry completely.
- Cut your blue painter’s tape slightly shorter than the adhesive strip to keep it completely hidden behind the wood molding.
- Press the blue tape onto the wall, rubbing it firmly with the back of a metal spoon to activate the pressure-sensitive tack and push out microscopic air bubbles.
- Remove the wall-side liner from your adhesive strip and press it fiercely onto the blue tape for exactly 30 seconds.
- Wait one full hour before pressing your heavy wood molding onto the receiving side of the strips to let the bond cure.
Tactical Toolkit: Keep 70 percent Isopropyl alcohol on hand for wall prep. Use 2-inch wide, multi-surface blue painter’s tape as your base. Source large, interlocking picture-hanging strips rated for 16 pounds per pair. Always respect the 60-minute minimum cure time before letting the strips bear the weight of the wood.
Owning Your Environment
Living in a space you do not technically own often feels like wearing someone else’s clothes. You hesitate to settle in completely, constantly aware of the invisible boundaries drawn by a landlord’s rules and the threat of lost deposits.
Mastering this quiet, simple trick changes your relationship with home. It proves that high-end, customized design is not reserved exclusively for those with property deeds, nail guns, and heavy machinery. You can mold your environment to fit your taste without leaving scars behind.
When you press that final piece of heavy molding into place, hearing the satisfying click of the plastic strips locking together, you are not just decorating a room. You are taking full control of your surroundings, crafting permanence out of temporary materials, and proving that resourcefulness always outshines restriction.
The smartest carpenters know that the strongest joints aren’t always made with steel; sometimes, they are made with an understanding of how materials speak to each other.
| Key Point | Detail | Added Value for the Reader |
|---|---|---|
| Standard Application | Adhesive strip placed directly onto painted drywall. | High risk of paper tearing and loss of security deposit upon removal. |
| Tape Buffer Method | Blue painter’s tape placed between the wall and the adhesive. | Zero damage to drywall, allowing for heavy wood molding in rental properties. |
| Pressure Activation | Rubbing the blue tape with a spoon before adding the adhesive strip. | Removes air bubbles, maximizing surface friction and shear resistance. |
Will the blue tape dry out and peel off over time?
Quality blue painter’s tape uses an acrylic adhesive designed to resist drying out under normal indoor temperatures, ensuring a stable bond for years.
Can I use masking tape instead of blue tape?
No. Standard masking tape uses a rubber-based adhesive that turns brittle and bakes into the wall over time, causing severe damage when removed.
How much weight can this method actually hold?
When using large interlocking strips on a proper blue tape base, you can safely hold solid MDF wainscoting panels up to 16 pounds per pair of strips.
Does this work on heavily textured walls?
This method is best suited for flat or eggshell finishes on smooth drywall. Heavy orange peel or popcorn textures reduce the surface contact needed for a secure hold.
How do I remove it when my lease is up?
Pull the heavy molding straight off the interlocking strips first. Then, pull the adhesive strip’s stretch-tab as usual. Finally, gently peel the blue tape back at a 45-degree angle.